This guide focuses on TM1637 4 digit 7 segment display module and its interfacing with Raspberry Pi Pico. Unlike the 4-Digits 7 segment display which uses 12 pins to connect with a microcontroller, the TM1637 only uses four pins which makes it a very convenient choice of use. We will discuss this module’s description, pinout, and connection with the Raspberry Pi Pico board. Then we will show you a MicroPython sketch that will familiarize you with the module.
Prerequisites
Before we start this lesson make sure you are familiar with and have the latest version Python 3 in your system, have set up MicoPython in Raspberry Pi Pico, and have a running Integrated Development Environment(IDE) in which we will be doing the programming. We will be using the same Thonny IDE as we have done previously when we learned how to blink and chase LEDs in micropython.
Components Required
– A Raspberry Pi Pico or Pico W.
– A TM1637 7-segment display module.
– Breadboard and connecting wires.
– USB cable to connect the Raspberry Pi Pico.
TM1637 4-digit 7 Segment Display Module
TM1637 4 digit display Module is a 4-pin module for digital display through the combination of four 7-segments. The module is basically for a digital display of alphanumeric data. The basic structure of the module is the combination of four 7-segments and two LEDs. The LEDs are used as a ratio sign display. Therefore, the whole LCD comes up with the 12 pins output but TM1637 IC minimizes them to only four pins. The small number of pins of the module and display of data with 7-segment makes it preferable by some developers. The module is quite popular in most commercial and industrial products.
Features
– The use of only two pins can control the four combined 7-segments.
– The device is compatible with Raspberry Pi Pico board with the use of a single library.
– Any alphanumeric value can show on the module from the microcontroller.
– The module TM1637 gives the 8 luminance levels which are adjustable through the programming.
– The device operates on both 3.3V and 5V.
Pinout
The TM1637 display is popular because of its small number of control pins. Out of these 4 pins, two of them are power pins and the rest two pins control the display value on the module.
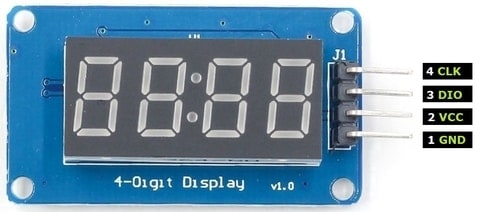
| Pin Name | Function |
|---|---|
| CLK | The Clock pin helps to keep the clock pulse sync in with module and microcontroller. |
| DIO | The data pin helps in sending and receiving data from the microcontroller. |
| GND | The ground (GND) is used to make the common ground with external devices. |
| VCC | The power (VCC) input pin to power the module. Accepts 3.3-5V VCC. |
Raspberry Pi Pico I2C Pins
RP2040 chip has two I2C controllers. Both I2C controllers are accessible through GPIO pins of Raspberry Pi Pico. The following table shows the connection of GPIO pins with both I2C controllers. Each connection of the controller can be configured through multiple GPIO pins as shown in the figure. But before using an I2C controller, you should configure in software which GPIO pins you want to use with a specific I2C controller.
| I2C Controller | GPIO Pins |
|---|---|
| I2C0 – SDA | GP0/GP4/GP8/GP12/GP16/GP20 |
| I2C0 – SCL | GP1/GP5/GP9/GP13/GP17/GP21 |
| I2C1 – SDA | GP2/GP6/GP10/GP14/GP18/GP26 |
| I2C1 – SCL | GP3/GP7/GP11/GP15/GP19/GP27 |
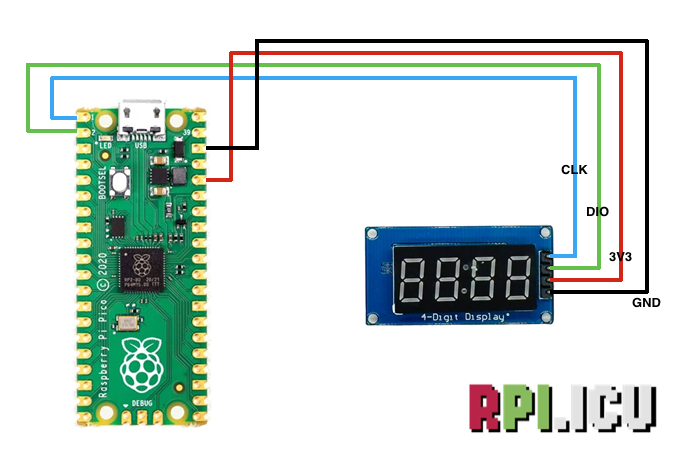
The connections between the two devices are fairly simple. We have used GP26 to connect with CLK and GP27 to connect with DIO. You can use other combinations of SDA/SCL pins as shown in the table above as well.
Follow the diagram below:
Installing TMP1637 Library
To program our Raspberry Pi Pico with the TM1637 display module we will require the TM1637 library from GitHub.
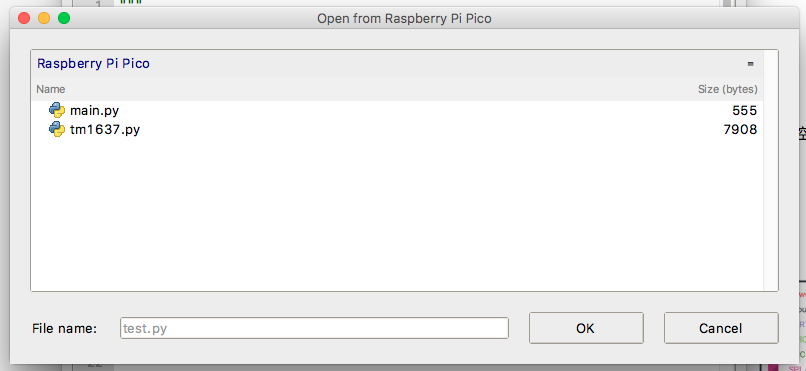
Copy this library and save it in your Raspberry Pi Pico with the name tm1637.py. Open a new file in Thonny. Copy the library given below or take it from this link. Save it to Raspberry Pi Pico with name tm1637.py under the lib folder.
tm1637.py
"""
MicroPython TM1637 quad 7-segment LED display driver
https://github.com/mcauser/micropython-tm1637
MIT License
Copyright (c) 2016 Mike Causer
Permission is hereby granted, free of charge, to any person obtaining a copy
of this software and associated documentation files (the "Software"), to deal
in the Software without restriction, including without limitation the rights
to use, copy, modify, merge, publish, distribute, sublicense, and/or sell
copies of the Software, and to permit persons to whom the Software is
furnished to do so, subject to the following conditions:
The above copyright notice and this permission notice shall be included in all
copies or substantial portions of the Software.
THE SOFTWARE IS PROVIDED "AS IS", WITHOUT WARRANTY OF ANY KIND, EXPRESS OR
IMPLIED, INCLUDING BUT NOT LIMITED TO THE WARRANTIES OF MERCHANTABILITY,
FITNESS FOR A PARTICULAR PURPOSE AND NONINFRINGEMENT. IN NO EVENT SHALL THE
AUTHORS OR COPYRIGHT HOLDERS BE LIABLE FOR ANY CLAIM, DAMAGES OR OTHER
LIABILITY, WHETHER IN AN ACTION OF CONTRACT, TORT OR OTHERWISE, ARISING FROM,
OUT OF OR IN CONNECTION WITH THE SOFTWARE OR THE USE OR OTHER DEALINGS IN THE
SOFTWARE.
"""

from micropython import const
from machine import Pin
from time import sleep_us, sleep_ms

TM1637_CMD1 = const(64)  # 0x40 data command
TM1637_CMD2 = const(192) # 0xC0 address command
TM1637_CMD3 = const(128) # 0x80 display control command
TM1637_DSP_ON = const(8) # 0x08 display on
TM1637_DELAY = const(10) # 10us delay between clk/dio pulses
TM1637_MSB = const(128)  # msb is the decimal point or the colon depending on your display

# 0-9, a-z, blank, dash, star
_SEGMENTS = bytearray(b'\x3F\x06\x5B\x4F\x66\x6D\x7D\x07\x7F\x6F\x77\x7C\x39\x5E\x79\x71\x3D\x76\x06\x1E\x76\x38\x55\x54\x3F\x73\x67\x50\x6D\x78\x3E\x1C\x2A\x76\x6E\x5B\x00\x40\x63')

class TM1637(object):
    """Library for quad 7-segment LED modules based on the TM1637 LED driver."""
    def __init__(self, clk, dio, brightness=7):
        self.clk = clk
        self.dio = dio

        if not 0 <= brightness <= 7:
            raise ValueError("Brightness out of range")
        self._brightness = brightness

        self.clk.init(Pin.OUT, value=0)
        self.dio.init(Pin.OUT, value=0)
        sleep_us(TM1637_DELAY)

        self._write_data_cmd()
        self._write_dsp_ctrl()

    def _start(self):
        self.dio(0)
        sleep_us(TM1637_DELAY)
        self.clk(0)
        sleep_us(TM1637_DELAY)

    def _stop(self):
        self.dio(0)
        sleep_us(TM1637_DELAY)
        self.clk(1)
        sleep_us(TM1637_DELAY)
        self.dio(1)

    def _write_data_cmd(self):
        # automatic address increment, normal mode
        self._start()
        self._write_byte(TM1637_CMD1)
        self._stop()

    def _write_dsp_ctrl(self):
        # display on, set brightness
        self._start()
        self._write_byte(TM1637_CMD3 | TM1637_DSP_ON | self._brightness)
        self._stop()

    def _write_byte(self, b):
        for i in range(8):
            self.dio((b >> i) & 1)
            sleep_us(TM1637_DELAY)
            self.clk(1)
            sleep_us(TM1637_DELAY)
            self.clk(0)
            sleep_us(TM1637_DELAY)
        self.clk(0)
        sleep_us(TM1637_DELAY)
        self.clk(1)
        sleep_us(TM1637_DELAY)
        self.clk(0)
        sleep_us(TM1637_DELAY)

    def brightness(self, val=None):
        """Set the display brightness 0-7."""
        # brightness 0 = 1/16th pulse width
        # brightness 7 = 14/16th pulse width
        if val is None:
            return self._brightness
        if not 0 <= val <= 7:
            raise ValueError("Brightness out of range")

        self._brightness = val
        self._write_data_cmd()
        self._write_dsp_ctrl()

    def write(self, segments, pos=0):
        """Display up to 6 segments moving right from a given position.
        The MSB in the 2nd segment controls the colon between the 2nd
        and 3rd segments."""
        if not 0 <= pos <= 5:
            raise ValueError("Position out of range")
        self._write_data_cmd()
        self._start()

        self._write_byte(TM1637_CMD2 | pos)
        for seg in segments:
            self._write_byte(seg)
        self._stop()
        self._write_dsp_ctrl()

    def encode_digit(self, digit):
        """Convert a character 0-9, a-f to a segment."""
        return _SEGMENTS[digit & 0x0f]

    def encode_string(self, string):
        """Convert an up to 4 character length string containing 0-9, a-z,
        space, dash, star to an array of segments, matching the length of the
        source string."""
        segments = bytearray(len(string))
        for i in range(len(string)):
            segments[i] = self.encode_char(string[i])
        return segments

    def encode_char(self, char):
        """Convert a character 0-9, a-z, space, dash or star to a segment."""
        o = ord(char)
        if o == 32:
            return _SEGMENTS[36] # space
        if o == 42:
            return _SEGMENTS[38] # star/degrees
        if o == 45:
            return _SEGMENTS[37] # dash
        if o >= 65 and o <= 90:
            return _SEGMENTS[o-55] # uppercase A-Z
        if o >= 97 and o <= 122:
            return _SEGMENTS[o-87] # lowercase a-z
        if o >= 48 and o <= 57:
            return _SEGMENTS[o-48] # 0-9
        raise ValueError("Character out of range: {:d} '{:s}'".format(o, chr(o)))

    def hex(self, val):
        """Display a hex value 0x0000 through 0xffff, right aligned."""
        string = '{:04x}'.format(val & 0xffff)
        self.write(self.encode_string(string))

    def number(self, num):
        """Display a numeric value -999 through 9999, right aligned."""
        # limit to range -999 to 9999
        num = max(-999, min(num, 9999))
        string = '{0: >4d}'.format(num)
        self.write(self.encode_string(string))

    def numbers(self, num1, num2, colon=True):
        """Display two numeric values -9 through 99, with leading zeros
        and separated by a colon."""
        num1 = max(-9, min(num1, 99))
        num2 = max(-9, min(num2, 99))
        segments = self.encode_string('{0:0>2d}{1:0>2d}'.format(num1, num2))
        if colon:
            segments[1] |= 0x80 # colon on
        self.write(segments)

    def temperature(self, num):
        if num < -9:
            self.show('lo') # low
        elif num > 99:
            self.show('hi') # high
        else:
            string = '{0: >2d}'.format(num)
            self.write(self.encode_string(string))
        self.write([_SEGMENTS[38], _SEGMENTS[12]], 2) # degrees C

    def show(self, string, colon=False):
        segments = self.encode_string(string)
        if len(segments) > 1 and colon:
            segments[1] |= 128
        self.write(segments[:4])

    def scroll(self, string, delay=250):
        segments = string if isinstance(string, list) else self.encode_string(string)
        data = [0] * 8
        data[4:0] = list(segments)
        for i in range(len(segments) + 5):
            self.write(data[0+i:4+i])
            sleep_ms(delay)


class TM1637Decimal(TM1637):
    """Library for quad 7-segment LED modules based on the TM1637 LED driver.
    This class is meant to be used with decimal display modules (modules
    that have a decimal point after each 7-segment LED).
    """

    def encode_string(self, string):
        """Convert a string to LED segments.
        Convert an up to 4 character length string containing 0-9, a-z,
        space, dash, star and '.' to an array of segments, matching the length of
        the source string."""
        segments = bytearray(len(string.replace('.','')))
        j = 0
        for i in range(len(string)):
            if string[i] == '.' and j > 0:
                segments[j-1] |= TM1637_MSB
                continue
            segments[j] = self.encode_char(string[i])
            j += 1
        return segments
Raspberry Pi Pico MicroPython: TM1637 Sketch
Raspberry Pi Pico W needs to be preloaded with a MicroPython UF2 file to program it in MicroPython. You can read our getting started guide for Raspberry Pi Pico where we show all steps required to start programming RP2040 in MicroPython.
If you are using macOS, follow our guide to program Raspberry Pi Pico on macOS using Thonny IDE.
With all connections done as shown in the diagram above, connect the Pico to your computer using a USB cable. Open your IDE, and paste the following code into a new project.
import tm1637
from machine import Pin
import time
tm = tm1637.TM1637(clk=Pin(0), dio=Pin(1))

#set brightness(0-7)
tm.brightness(5)
# display "10:24"
tm.numbers(10, 24, colon=True)
time.sleep(2)
# Word
tm.show("AbCd", colon=False)
time.sleep(2)
# display "COOL"
tm.write([0b00111001, 0b00111111, 0b00111111, 0b00111000])
time.sleep(2)
# Clear all
tm.show("    ")
time.sleep(2)
# display "bEEF"
tm.hex(0xbeef)
time.sleep(2)
# display "-123"
tm.number(-123)
time.sleep(2)
# show temperature '24*C'
tm.temperature(24)
time.sleep(2)
#scroll display contents
tm.scroll('RPI-ICU', delay=250)
Run the code by clicking the Run icon or by pressing the F5 key. Save the script to your Raspberry Pi Pico as main.py or any other name with a “.py” filename extension.
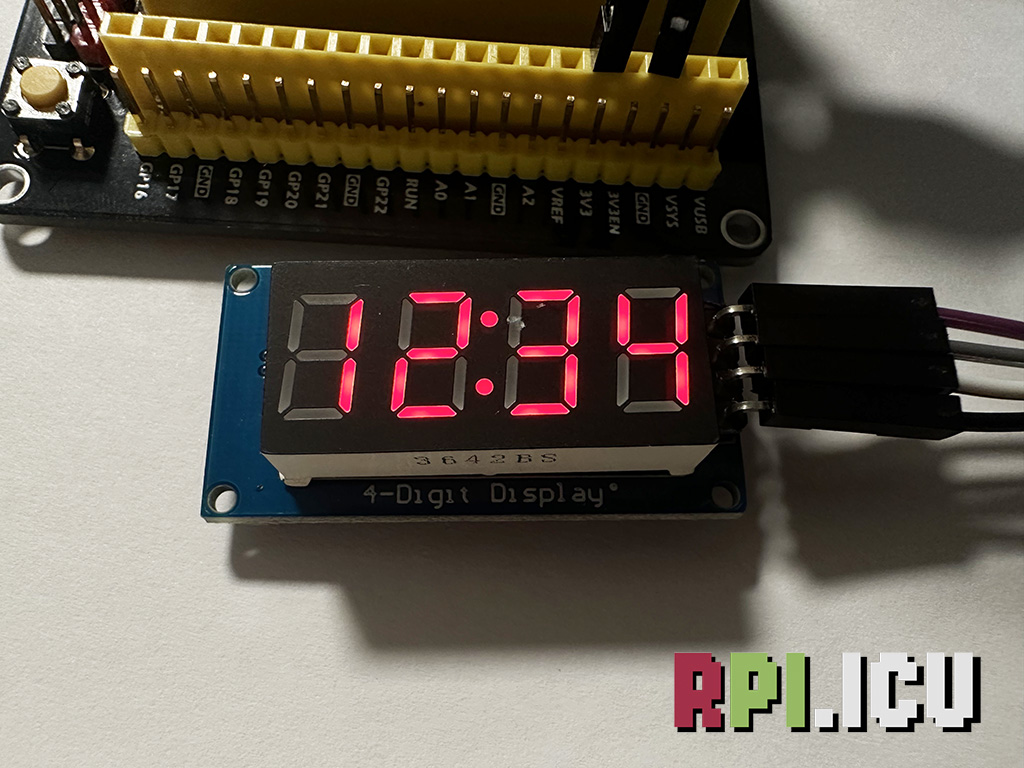
When the code is successfully uploaded, you must see the TM1637 module display changing characters with a delay of 2 seconds between each change.
TM1637 MicroPython Code Explained
First, we import the necessary modules. The TM1637 module to communicate with the 7-segment display, the Pin module to set Pico W pins as output pins, and the time module to set delays between code execution.
import tm1637
from machine import Pin
import time
We then define an instance called tm and initiate the pins 0 and 1 of Raspberry Pi Pico to be interfaced with the pins CLK and DIO respectively.
tm = tm1637.TM1637(clk=Pin(0), dio=Pin(1))
tm.brightness can be set with a value between 1 to 7. Setting it to “1” sets the TM1637 brightness to the lowest, and “7” lights up all LEDs brightly.
tm.brightness(5)
The next lines display 2 independent numbers on either side of the colon, with leading zeros. The argument colon can be set to False if you do not want the colon to show between the numbers.
tm.numbers(10, 24, colon=True)
time.sleep(2)
The function write can be used to light up each segment of the LEDs. Its parameters are 8-bit binary numbers where each bit corresponds to one segment of a 7-segment display.
tm.write([0b00111001, 0b00111111, 0b00111111, 0b00111000])
To understand the above code better, let us see a 7-segment display with the segments labeled.
     __2__
    |     |    |  0 ->  011 1111 -> 0x3f
  1 |     | 3  |  1 ->  010 0001 -> 0x21
    |__7__|    |  2 ->  111 0110 -> 0x76
    |     |    |  4 ->  ...
  6 |     | 4  |        ...
    |__5__|    |  9 ->  ...      -> 0x5f
In the function tm.write, the first argument is 0b00111001, which will display the first letter of the word “cool”(i.e. letter c) on TM1637 module. The least significant bit in the argument represents segment ‘a’ and the most significant bit is for segment ‘DP’. So 0b00111001 will light up the segments a, d, e, and f in a 7-segment display. Similarly, the arguments 0b00111111, 0b00111111, and 0b00111000 will display the letters ‘o’, ‘o’, & ‘l’ respectively.
Next, we display a string ‘heya’ using tm.show function, a hex value using tm.hex , and a negative number using tm.number. The function tm.number can display numbers -999 through 9999 and the numbers will be right aligned.
tm.show('heya', colon=False)
tm.hex(0xbeef)
tm.number(-123)
If the contents you want to display do not fit in the 4-digit segments of TM1637, you can scroll the contents using the scroll() function. The delay argument takes values in milliseconds and it is the time for which a character stays in a segment before scrolling to the left.
scroll('scrolling', delay=250)
Demonstration
Once the code is uploaded to your board, the TM1637 display will show all the different numbers and texts.